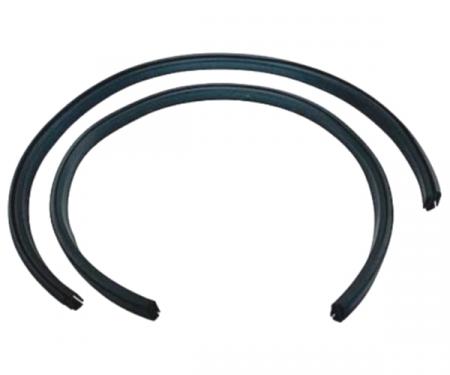
Precision Glass Run Channel Kit GRK 2110 80 is a two-piece left and right glass run channel set designed to guide and seal a vehicle's side window. These channels keep the window aligned in the door, reduce wind noise and vibration, and help prevent water intrusion and wear to the window edge. Made for restoration and replacement applications, the kit delivers durable, weather-resistant performance and straightforward installation — verify specific vehicle fitment before ordering to ensure compatibility.
Features:
- Verify OEM fitment for your vehicle before purchase; this kit is sold as a left and right 2-piece set.
- Replaces worn or damaged glass run channels to restore smooth window operation and proper alignment.
- Helps seal against water and wind, reducing leaks, drafts, and exterior noise.
- Durable construction with corrosion-resistant backing and a resilient sealing surface for long service life.
- Designed for restoration and maintenance — ideal for repairing rattles, binding windows, or leaking doors.
- Supplies both left-hand and right-hand channels in one kit for convenient replacement.
Installation / Application:
- Difficulty: 3/5
- Estimated time: 45–60 minutes (per door set)
Instructions:
- Safety first: park on level ground, set parking brake, and disconnect the negative battery terminal if your vehicle has power windows.
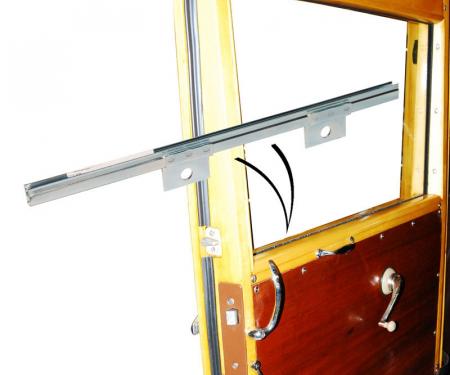
- Lower the window fully so the run channel is accessible in the door opening.
- Remove the interior door panel and any trim necessary to access the inner door cavity and the top of the glass run.
- Carefully peel back or remove the moisture barrier to expose the channel attachment points; keep the barrier intact for reinstallation.
- Locate and remove any fasteners, clips, or retaining strips holding the old glass run in place. Use a trim tool or pliers as needed.
- Withdraw the old run channel by sliding or pulling it free from the door frame and window edge. Clean the channel path and wipe away dirt, debris, and old adhesive.
- Test-fit the new left/right channels to confirm correct orientation. Apply a light lubricant or soapy water to the sealing edge to ease installation.
- Install the new channel into the door frame, seating it fully into any clip locations or mounting points. Ensure the channel aligns with the window glass and door jamb.
- Reinstall any fasteners or clips to secure the channel. Manually cycle the window up and down several times to confirm smooth operation and correct alignment.
- Reapply the moisture barrier, refit the door panel and trim, reconnect the battery (if disconnected), and perform a final leak/noise check.
About Precision Replacement Parts
Since 1986 Precision Replacement Parts has been a trusted name in the Automotive Glass Industry.
Our knowledge and experience in manufacturing millions of extruded and molded EPDM Rubber, PVC and HDPE based plastics, and various stamped and extruded metal products for the classic and late model industries has allowed Precision to expand our services into multiple product markets.
Along with our own USA based production facility, Precision also partners with 25 different manufactures worldwide with a reputation as a global leader supplying OEM and replacement products to a number of different industries. Our partnerships along with our own in-house manufacturing and fabrication capability gives Precision a unique position in helping to meet the expanding needs of customers everywhere, providing them with a sustained competitive advantage.

Vehicle Fitment:
The Vehicle Fitment Guide is to be used as a general reference. The data has been provided by our suppliers and manufacturers and may contain errors or incorrect data. Always refer to a professional to verify correct fitment for your vehicle.
| Make |
Model |
Years |
| Ford |
Bronco |
1980 - 1996 |
| Ford |
F-100 |
1980 - 1983 |
| Ford |
F-150 |
1980 - 1996 |
| Ford |
F-250 |
1980 - 1998 |
| Ford |
F-350 |
1980 - 1998 |